In this post I’m going to share some knowledge of the Daydream VR Controller, and show you how easy it is to build a laser pointer with the Controller API in Unity. As of writing (September 2016) Daydream hasn’t yet been released. For more info on the release date and Daydream VR in general visit the official Google VR Daydream website.
Update (01/08/17): This tutorial was originally written using a pre-release version of the Daydream Unity SDK. The code in the tut is still totally valid, but the linked Unity package uses an older SDK so may not run in recent versions of Unity. See my UPDATED tutorials here on setting up Daydream and here on building a working controller based app with teleportation that uses the release SDK.
The Controller API
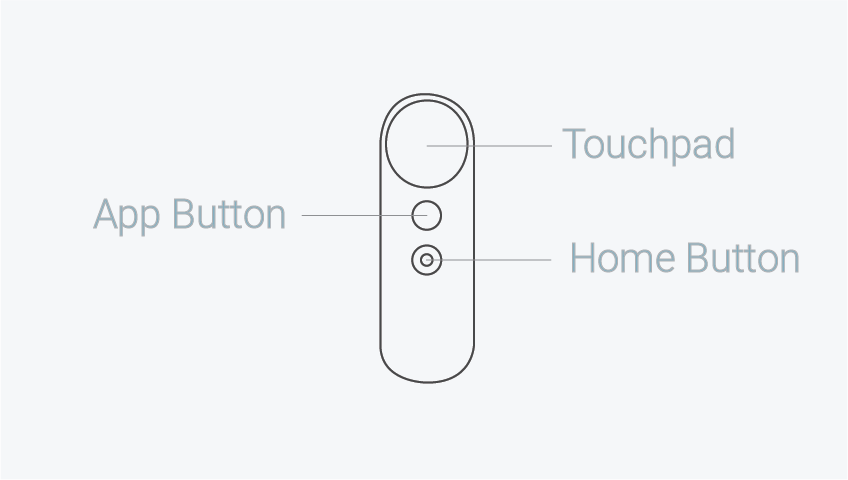
The Daydream handheld controller is one of the differentiating features of Google’s Daydream VR platform. From the user’s perspective there are three main interaction points: the Touchpad, the App Button and the Home Button. From the developers perspective there are really only two interaction points as the Home Button is reserved for the system. We access the Touchpad and the App Button via the Controller API’s GVRController class. From this class it is possible to track finger position on the touchpad and listen for touches on the buttons. Touch states are reported through two types of properties: state properties and transient properties. State properties report whether the touchpad or button is currently being pressed and transient properties report events immediately after they happen (just pressed, just released). The GVRController class exposes the following values for the Touchpad:
- IsTouching: True if is currently touching the touchpad (state property)
- TouchDown: True 1 frame after user starts touching the touchpad (transient property)
- TouchUp: True 1 frame after user stops touching the touchpad (transient property)
- TouchPos: Position of the current touch, if touching. If not touching, then this is the position of the last touch (when the finger left the touchpad, state property)
The API also gives you access to the Controller’s accelerometer, gyroscope, and orientation. Find out more about the Controller API from the Daydream developer website here.
Frickin’ Laser Beams
Let’s get started by creating a laser pointer that locks to the rotational movement of the Daydream controller and the user’s wrist. Because Daydream hasn’t been released yet (September 2016) if you want to test out the controller you’ll need to setup an Android phone running the Daydream Controller Emulator. You’ll also need to setup a Daydream developer kit. My previous Daydream post here takes you through these steps. Once you’re setup with the Daydream developer kit you’ll find building for the platform is pretty straight forward and a lot of fun.
Download the Unity package from here, import it into a new Unity project and open the scene. The laser is being drawn with a Line Renderer that shoots from the end of the controller inside the ControllerObject GameObject. The laser’s direction is being raycast so when it hits a GameObject with the tag “FruitTag” that gameObject is Destroyed. It’s essentially the start of a Fruit Ninja style game.
The Code
We use the Daydream GvrController API to access the Orientation property of the controller, then we assign this to the GameObject’s localRotation (line 16). By multiplying the Orientation by Vector3.forward we get the forward direction for the controller (line 18). This is passed into our ShootLaserFromTargetPosition method (line 20). That then raycasts from the controller along the direction for a specified distance. If the raycast hits a gameObject with the correct tag it destroys the GameObject (line 29-32). Extending the ray out from the controller position along the specified length, gives us the end point we can then use to draw our laser with the LinerRenderer in the scene (line 36).
using UnityEngine;
using System.Collections;

public class ControllerManagerScript : MonoBehaviour {

	public LineRenderer laser;

	void Start () {
		Vector3[] initLaserPositions = new Vector3[ 2 ] { Vector3.zero, Vector3.zero };
		laser.SetPositions( initLaserPositions );
		laser.SetWidth( 0.01f, 0.01f );
	}

	void Update () {
		Quaternion ori = GvrController.Orientation;
		gameObject.transform.localRotation = ori;

		Vector3 v = GvrController.Orientation * Vector3.forward;

		ShootLaserFromTargetPosition( transform.position, v, 200f );
		laser.enabled = true;
	}

	void ShootLaserFromTargetPosition( Vector3 targetPosition, Vector3 direction, float length )
	{
		Ray ray = new Ray( targetPosition, direction );
		RaycastHit raycastHit;

		if( Physics.Raycast( ray, out raycastHit, length ) ) {
			GameObject fruitObject = raycastHit.transform.gameObject;
			if (fruitObject.tag == "FruitTag") {
				Destroy (raycastHit.transform.gameObject);
			}
		}

		Vector3 endPosition = targetPosition + ( length * direction );
		laser.SetPosition( 0, targetPosition );
		laser.SetPosition( 1, endPosition );
	}
}
This is a fun little mechanic that shows you how easy it is to get started playing around with the Daydream Controller. Without much more effort you could easily turn this into a Fruit Ninja style game, a laser shooting game or a sword fighting game. I’ve created a Unity package with everything setup inside a scene. Download and play around with it from here. Also check out the Daydream SDK demoScenes in the package for more examples of interfacing with the Daydream Controller API.
Disclaimer: I’m a Google employee and write blog posts like this with the sole purpose of encouraging and inspiring developers to start exploring Google’s amazing Daydream VR platform. Opinions expressed in this post are my own and do not reflect those of my employer. I would never share any secret or proprietary information.
Terry Harding
I would like some help on raycasting in a daydream app I am working on. The rays were pretty much perfect until I added some culling masks to the main camera. The idea is to have buttons only show when the touchpad is touched. I have all the other objects set to the default layer with the buttons and panel set to UI layer.
I declare:
private LayerMask dM;
private LayerMask uIM;
private bool touchedPad;
set (in Start):
dM = (1 << LayerMask.NameToLayer("Default"));
uIM = (1 << LayerMask.NameToLayer("UI"));
touchedPad = false;
in Update I have:
if (GvrController.IsTouching && !touchedPad) {
StartCoroutine (touchingPad (true));
} else if(!GvrController.IsTouching && touchedPad){
StartCoroutine (touchingPad (false));
}
then:
private IEnumerator touchingPad(bool touchingNow){
if (touchingNow){
Camera.main.cullingMask = dM | uIM;
touchedPad = true;
yield return null;
} else if (!touchingNow){
Camera.main.cullingMask = dM;
touchedPad = false;
yield return null;
}
}
All this works to get the buttons to show only when the touchpad is touched. If I point the controller at the buttons the selected color shows correctly and the buttons work fine when I press the touchpad.
The ray, with its reticle, is visible until the first time I touch the pad, then everything works but there is no ray to help in aiming. Can you suggest something, or at least suggest a place to look?
Terry Harding
Sorry, fixed it.