
It is the great paradox of virtual reality that we can be whoever we want to be, do whatever we want to do, and yet for some reason it all feels a bit lonely. We are social animals but the truth is that most people find virtual reality rather isolating. Isolation is boring, and bored users don’t come back to your app. If VR is to become mainstream we need to solve for this basic human need by turning the virtual world into a social space.
Another interesting contradiction of VR is that some of the most compelling experiences, on any of the various platforms, happen in some of the most mundane of social VR environments. Think throwing a ball with strangers in Rec Room, or roasting marshmallows on a virtual fire in Altspace. There is almost an inverse relationship between the amount of fun had in social VR and the banality of the environment.
Keeping all that in mind, in this tutorial we’ll brush the surface of copresence and create a base for you to build your own social VR explorations using Daydream, Unity, and the Photon framework (and, in the process, create a pretty banal environment).
Multiplayer Networking With Photon
Photon is a third party platform for building multiplayer games in Unity. The cool thing about Photon, apart from it being extremely easy to setup, is they have a free tier so you can start building out your game at no cost. No cost, no backend effort, and as the user base scales the prices are fairly reasonable. It’s also a great platform for getting your head around some of the more complex concepts of building a multiplayer game.
Everything that Photon provides can be done by rolling your own with Unity Networking, however, Photon deals with hosting, scaling the backend and generally making the process of indie game development as smooth as possible. That’s why I’m using it for this tutorial.
(04/05/17 update) PLEASE NOTE: This tutorial and the working package use the Google VR SDK 1.3 and the Unity 5.6 beta. Things will no doubt change with the SDK in the future so this tutorial may not be compatible with future SDKs or versions of Unity, I’ll endeavor to update when I can.
Let’s Get Started
This tutorial uses my previous tutorial: Building A Daydream Controller From Scratch as a starting point, so you can either complete that tutorial first or just download the finished package here and use that as the base. The finished package for this tutorial is at the end of the Installing Photon section.
The first thing to do is import the base package into a new Unity project. Make sure it builds to your phone and check that you can teleport around the environment. Once you’ve got the base Unity project setup let’s break down what we’ll be doing next. There are three things we’re going to be covering in this tut:
- Setup and installation of Photon.
- Implement the Photon classes in our current base Unity project.
- Refactor the Player gameObect so that it works in a multiplayer context and get it teleporting based on the refactoring.
Installing Photon
We need to create a Photon account, install Photon and then test the finished tutorial’s Unity Package with our newly created Photon AppID.
- Head over to the Photon Engine website, and create an account. We’re going to be using PUN (Photon Unity Networking), so check out that section and spend some time looking around the site. There are a lot of great resources, docs and tutorials on multiplayer game development.
- After creating an account and verifying your email navigate to the dashboard and click “create new app” button if there isn’t an app there already. Photon Type should be “Photon Realtime” and add a name. Click create.
- Under the name of your newly created App is an AppID, you’re going to need this later so keep it close.
- Navigate to the “Documentation” tab and in the drop-down select “PUN”,
- Click on the “Get PUN Free” button, download the Unity Networking Free package from the asset store and import it into the project.
- In the PUN setup dialog box, paste your AppID.
- Search the project for “PhotonServerSettings” and make sure “Auto-Join Lobby” is selected.
Now you’ve installed Photon, you should be able to run the finished tutorial package with your App ID and test the multiplayer mode. To see it working you’ll need to build two separate instances, either on two Daydream phones or one phone and one computer instance. I recommend having a dig around in the code of the finished project to see how things work and then using this tutorial to illustrate the rationale for the steps I took.
Implementing Photon Framework
The hardest thing to wrap your head around when using Photon is there are two versions of a Player: local and remote. The local instance is owned by the local client and updates based on the user’s HMD and actual Player position, it sends this data to the network. The network then syncs this data with all remote instances of the Player who receive this data. The tricky part is both versions use the same classes, so we need a way to differentiate between them. This is done by checking the PhotonView’s boolean “isMine” value to see if the current Player is the one we need to update or is a remote instance. Based on this bool, we either Send or Receive data.
To implement Photon we’re going to add a class called a PhotonView to our Player gameObject so that it syncs it’s translational and rotational data with the other instances on the network and defines components to observe.
-
- Select the Player gameObject in the Hierarchy and in the Inspector click “Add Component” and add a new PhotonView.
- Next, add a new C# script to the Player called “NetworkPlayer.cs” that extends Photon.Monobehavior, and update it so that it looks like this:
using System.Collections;
using System.Collections.Generic;
using UnityEngine;

public class NetworkPlayer : Photon.MonoBehaviour {

	public GameObject otherPlayerController;
	public GameObject playerController;
	public GameObject otherPlayerHead;
	public Camera playerCamera;

	private Vector3 correctPlayerPos;
	private Quaternion correctPlayerRot = Quaternion.identity; // We lerp towards this

	void Update ()
	{
		// Check to see if this NetworkPlayer is the owned by the current instance
		if (!photonView.isMine)
		{
			// Lerping smooths the movement
			transform.position = Vector3.Lerp(transform.position, this.correctPlayerPos, Time.deltaTime * 5);
			otherPlayerHead.transform.rotation = Quaternion.Lerp(otherPlayerHead.transform.rotation, this.correctPlayerRot, Time.deltaTime * 5);
		}
	}

	public void OnPhotonSerializeView(PhotonStream stream, PhotonMessageInfo info)
	{
		if (stream.isWriting)
		{
			// We own this player: send the others our data
			stream.SendNext(transform.position);
			stream.SendNext(playerCamera.transform.rotation);

			this.photonView.RPC ("UpdateOtherPlayerController", PhotonTargets.Others, playerController.transform.localPosition, playerController.transform.localRotation);
		}
		else
		{
			// Network player, receive data
			this.correctPlayerPos = (Vector3)stream.ReceiveNext();
			this.correctPlayerRot = (Quaternion)stream.ReceiveNext();
		}
	}

	// OTHER PLAYER HAND CONTROLLER UPDATE
	[PunRPC]
	void UpdateOtherPlayerController(Vector3 pos, Quaternion rot)
	{
		otherPlayerController.transform.localRotation = rot;
		otherPlayerController.transform.localPosition = Vector3.Lerp(otherPlayerController.transform.localPosition, pos, Time.deltaTime * 5);
	}
}
The main purpose of this class is to send view data between the client and network. If the NetworkPlayer is owned by the local client it sends the data to the network, if it is running on a remote client it receives data from the network. At line 18 we check to see if this is the controlling PhotonView, if it is not we update the position and rotation of the gameObject by Lerping to the newly received values. Lerping smooths out the movement because we generally don’t get more than 12 calls per second from the Photon network. At line 26 OnPhotonSerializationView is where we either write or sync our gameObject data depending if this class is the owner or not. At lines 31 and 32 we send new data to the network and at line 34 we make a PunRPC method call, this calls a method on the remote instances of the class to update the controller position. At lines 39 and 40 we update the remote instances of the class with the received positional and rotational data. Line 46 is a PunPRC method, RPC stands for Remote Procedure Call. The RPC method is called across the network for all remote instances of this class. We’re using it here to update the controller mesh, because for reasons described later we don’t have a PhtonView on the GvrController.
Photon Comms Manager
The PhotonCommsManager acts as the gateway to the Photon backend. It’s where we set up the lobby and rooms, players are added or removed, and we receive global messages regarding the network status as a whole.
Create a new gameObject in the root of the Hierarchy, call it “PhotonCommsManager” and add a new script to it with the same name. The PhotonCommsManager needs to extend Photon.PunBehavior and should look like this:
using System.Collections;
using System.Collections.Generic;
using UnityEngine;
using UnityEngine.UI;
using Photon;

public class PhotonCommsManager : Photon.PunBehaviour {

	private GameObject currentPlayer;

	void Start () {
		PhotonNetwork.logLevel = PhotonLogLevel.Full;
		PhotonNetwork.ConnectUsingSettings ("0.1");
	}

	/////////////////////// Photon Methods  ///////////////////////

	public override void OnJoinedLobby () {
		PhotonNetwork.JoinRandomRoom ();
	}

	public override void OnJoinedRoom () {
		// instantiate user avatar locally and spawns in remote instances
		currentPlayer = PhotonNetwork.Instantiate("Player", new Vector3(0,1.6f,0), Quaternion.identity, 0);
		currentPlayer.GetComponent<PlayerController>().isControllable = true;
	}

	// This is called if there is no one playing or if all rooms are full, so create a new room
	void OnPhotonRandomJoinFailed()
	{
		Debug.Log("Can't join random room!");
		PhotonNetwork.CreateRoom(null);
	}

	void OnGUI()
	{
		GUILayout.Label(PhotonNetwork.connectionStateDetailed.ToString());
	}
}
At line 12 I’m setting the Log Level to full, this means the Photon error logs will be verbose for debugging. Line 13 kicks things off by connecting us to the Photon network, the “0.1” function parameter is just an arbitrary number based on the version of your app. At line 18 OnJoinLobby gets called when you’ve connected to the Photon Network and you’re waiting to pick a room. At line 19 we automatically add you to the next available room, if there are currently no rooms because you’re the first person the method OnPhotonRandomJoinFailed at line 29 is called and we create a new room. When you’ve joined a room the OnJoinedRoom method at line 29 is called where we instantiate a new Player gameObject and sync it with all remote clients. At line 25 we set the isControllable boolean in the PlayerController to true, so as to differentiate between local and remote instances of the PlayerController class.
Player Controller
The PlayerController deals with visual elements and non-network related updates to the local and remote Player. Create a new C# class on the Player gameObject that extends MonoBehaior called: “PlayerController”.
using System.Collections;
using System.Collections.Generic;
using UnityEngine;

public class PlayerController : MonoBehaviour {

	public GameObject gvrControllerPointer;
	public GameObject head;
	public GameObject otherPlayersController;
	public GameObject playerCamera;

	// Used to check if is this user's player or an external player
	public bool isControllable;

	void Start () {
		if (isControllable) {
			TeleportEvent teleportEvent = GameObject.Find("TeleportController").GetComponent<SDKBoyTeleportController>().teleportEvent;
			teleportEvent.AddListener (HandleTeleportEvent);
			playerCamera.SetActive (true);
			gvrControllerPointer.SetActive (true);
			head.SetActive (false);
			otherPlayersController.SetActive (false);
		} else {
			playerCamera.SetActive (false);
			gvrControllerPointer.SetActive (false);
		}
	}

	// Handle Telelport UnityEvent
	private void HandleTeleportEvent (Vector3 worldPos){
		gameObject.transform.position = new Vector3(worldPos.x, gameObject.transform.position.y, worldPos.z);
	}
}
There are two setups we need for the player depending on if the Player is a remote or local client. At line 17 we check for this and if the Player isControllable, is the local client, we set the GvrController and camera to active, add a listener for teleportation events and hide some of the remote client visual elements like the head and controller.
Visualizing the Player
Currently, the only visual elements the Player gameObject contains is the Daydream Controller, let’s fix this so we can see our other Players in the scene. I’ve added a sphere for the Player’s head, a rectangular prism for the Player’s body and a controller mesh to represent the remote Player’s controller. We can only have one instance of the GvrController in a scene, so we can’t use this for our remote player’s controllers. An easy fix is to just add a controller mesh for remote players that we can set active or inactive. I’ve added the “otherPlayersController” mesh to the Player GameObject and nested it inside a parent gameObject as a simple way to tweak the offset of the rotation.
This is the absolute bare minimum you need to create a crappy 3D character in VR and honestly, it looks pretty stupid. I expect you to try a bit harder than me in the creative department:
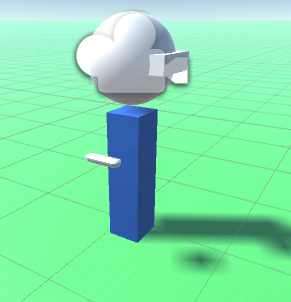
I’ve set the player’s y-pos to be 1.5 so the camera is well above the ground at a natural feeling height, the body extends below and doesn’t occlude the camera. We’re only going to show the sphere on the remote Player so it doesn’t occlude the camera on the local Player, you don’t need to see your own sphere head. This is toggled via code in the PlayerController’s Start method. Your Player Hierarchy should look similar to this:
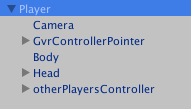
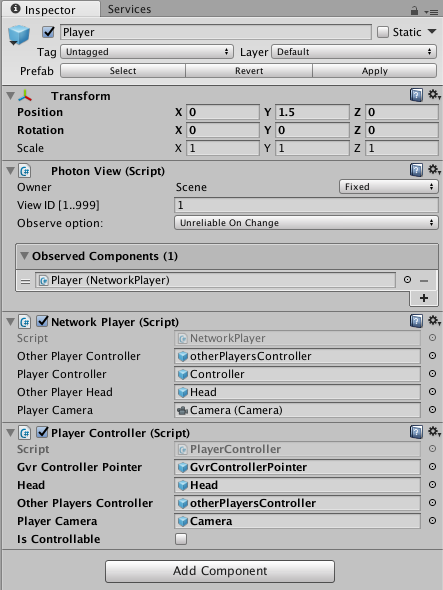
We then need to hook up the new Player elements to the public variables in the PlayerController and the NetworkPlayer scripts. I’ve also dragged the NetworkPlayer script into the PhotonView’s Observed Components field. The inspector should end up looking something like this:
The last, and probably most important thing we need to do is turn the Player into a prefab, remove it from the scene and add it to a directory called “Resources” so we can access it through code. We’re adding it dynamically via the PhotonCommsManager and we can only have one instance of the local Player per client otherwise there’ll be errors. Remember the Player prefab gameObject needs to be in a root directory called “Resources” for it to work.
At this point, you should be able to build the project on multiple separate phones and it’ll work. The only problem is that all Player instances are being instantiated on top of each other at the same location. To get around this you can change the Vector3 of the initial position in the PhotonCommsManager for each client.
Teleporting the Player
For our social VR world to actually feel somewhat social the least we can do is to get the Players moving around. The teleportation system from my previous tutorial won’t work because we’re dynamically adding the Player so it doesn’t make sense to hook it up in the editor. A clean way to send messages between decoupled objects is to use events. We’re going to use UnityEvents to fire an event when the ground is clicked on that will be handled by the Player. We do this by adding an EventTrigger on the ground plane to listen for the pointer click, then extract the PointerEventData from the EventTrigger, get the world position of the intersection between the Pointer and the ground and then update our Player’s position to that location.
The first thing to do is create an empty game object in the scene called “TeleportController” and add a script to it with the same name, my script looks like this:
using System.Collections;
using UnityEngine;
using UnityEngine.EventSystems;
using UnityEngine.Events;

public class TeleportEvent : UnityEvent<Vector3>
{
}

public class SDKBoyTeleportController : MonoBehaviour {

	public TeleportEvent teleportEvent;

	void Start()
	{
		if (teleportEvent == null) {
			teleportEvent = new TeleportEvent ();
		}
	}

	public void TeleportTo(BaseEventData data ) {
		PointerEventData pointerData = data as PointerEventData;
		Vector3 worldPos = pointerData.pointerCurrentRaycast.worldPosition;
		teleportEvent.Invoke(worldPos);
	}
}
At line 6 we create a custom public TeleportEvent class. At line 21 is the TeleportTo method linked to the EventTrigger. Here we extract the PointerEventData, pull out the worldPosition Vector3 from the Raycast and invoke a teleportEvent with the worldPos location as the parameter. In our PlayerController script at line 19, we’ve already added a listener and we handle the event at line 31, then we simply update the Player’s position with the new Vector3.
You’ll need to update the plane’s EventTrigger so it fires the TeleportController’s TeleportTo method on Click, the Inspector should look like this:
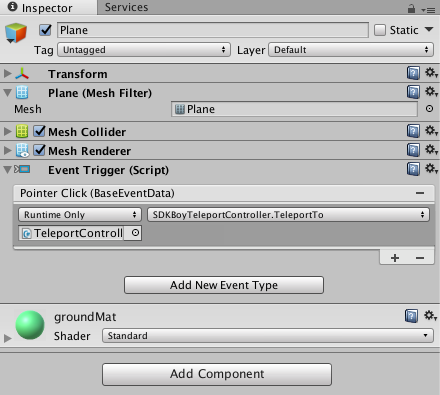
With that, the teleportation of the dynamically created Photon Player should work and you now have the base for a multiplayer VR game in Daydream.
In this tutorial, we’ve set the groundwork for a multiplayer VR game in Daydream, Unity, and Photon. We chose Photon because it’s free and easy to get started with, but we could also have rolled our own solution using Unity Networking. We created an avatar for the user that is spawned on remote clients when more people join the game, and we got our player teleporting around using Daydream’s GvrController and UnityEvents. Now it’s your job to create a fun mechanic, or just some awkwardly banal space for people to hang out in and wave at each other.
As VR developers and designers we need to start thinking about how VR will expand beyond the loneliness of singular headsets. What are the elemental building blocks of the metaverse? What are the interaction and UX paradigms? What will be the language of design and communication? The holy grail of VR is social, and it’s time to start building it!
Disclaimer: I’m a Google employee and write blog posts like this with the sole purpose of encouraging and inspiring developers to start exploring Google’s amazing Daydream VR platform. Opinions expressed in this post are my own and do not reflect those of my employer. I would never share any secret or proprietary information.
Andrew
Hey Sam,
I’ve actually been working on this (Photon with Daydream) the last week, so its really interesting to see the differences between our implementations.
For those wanting to add PhotonVoice to the multiplayer, Daydream has a UX quirk where it won’t ask for permissions on app startup. You will need to implement something similar to the “PermissionsDemo” in GVR SDK and edit the script to request the permission: “android.permission.RECORD_AUDIO”
I was stuck on this for hours not understanding why I could hear iOS and PC players but they could not hear me in multiplayer. There is nothing in Photon documentation about this either.
@_SamKeene
Hey Andrew, thanks for the comment and great tip on the Photon Voice work around!
Andrew
Hey @_SAMKEENE,
on Line 8 of the NetworkPlayer Script, which object in Project or Hierachy View slots in the Player Controller slot? I can’t find any Object in the Scene or Project called “Controller” and I’m not entirely sure what its being used for on line 34. Thanks!
Andrew
Don’t worry I found it. It’s the Controller under the GVRControllerPointer.
Andrew
Hey @_samkeene,
Even with this new decoupled teleport system, height adjust teleporting isn’t working. Each teleport you start to rise further and further in the air. I’ve been using this:
// Handle Telelport UnityEvent
private void HandleTeleportEvent (Vector3 worldPos){
float teleportDistance = Vector3.Distance(worldPos, transform.position);
if (teleportDistance <= 4.0f) {
gameObject.transform.position = new Vector3(worldPos.x, worldPos.y + transform.position.y, worldPos.z);
}
}
Any ideas?
Keith
@Andrew – where you have worldPos.y + transform.position.y, you need to replace transform.position.y with a static number that matches whatever offset you need, such as 1.6f
Jesse
Hey Sam,
Thanks a million for this guide, so far it’s working perfectly. I’m trying to figure out how to alter your code to spawn different types of character blueprints. Is this a fairly straightforward task? If possible, I’d like to assign different player types to people as they login. Any help would be greatly appreciated. Thanks again!
Raagul
I tried to implement this with the new GVR. For some reason, the player position does not change – but keeps coming back to 0,0,0. What am I missing here?